Overview
The new Policy management module is a central place to store and manage all your policy documents. The iP Suite will enable you to streamline the whole policy management process.
Policies may be uploaded in bulk and assigned to key staff within your organisation. Reminders are sent once the review date is reached and the policy can be reviewed and updated where necessary. The policies are next passed through any number of approvers, including governors, and signed off before being re-published.
The iP Suite Policy Management module helps you keep on top of managing your policies.
Location
This guide is centred around the Policy Management module. The segments focused around setting up the module or changing your settings can be found in the 'Settings' menu, whereas the instructions based around creating/managing policies can be found under the 'Policies' tab.
Please note that the Policies Module is sold separately from the main SchooliP system and you will not be able to follow this guide if your organisation is not subscribed to it.
Actions
Amending the Settings
The settings that may be changed include:

Accessing the Settings
You can access the Policy Management settings by clicking Policies in the menu on the left-hand side of the screen. The Policies will now be displayed. To access the settings simply click the 'cogs' icon located at the top right of the screen.
NOTE - If you do not see the 'cogs' icon you do not have the right to access the settings. Please see your administrator.
You may return back to the Policies by clicking the blue 'Policies' button at the top right of the screen. This button will toggle between settings and policies.
Settings - these set of checkboxes determine whether certain columns are displayed on the view of Policies
Areas - the Policy Area. Not essential, but allows you to split policies into key areas
Types - the type of policy e.g. DfE, Trust, School/College
Approval Levels - the level required to approve a policy e.g. Governing Body, Local Authority, Academy Trust, Headteacher
Review Cycles - how often is the policy to be reviewed? E.g. Annually, Live Document, Every 3 Years
Email Reminders - how often are the reminder emails sent? Are they sent before it is due, on the day it is due or every day afterwards?
Emails - these are the emails that may be sent as part of the process of reminding about the approval, review and viewing process
Bulk actions
Import Policies - this option will import the publicly available policies into the system as defined by the UK.gov website. These are simply placeholders for each of the required policies
Upload Policies - a useful option if you have already written your policies and have the documents located either on your local machine or available on your network. Rather than adding policies individually, you can drag and drop multiple policies in one simple step to upload them into the system
Managing your Policies
| CREATION | APPROVAL | REVIEW | VIEWING | ACKNOWLEDGE |
| Creation by staff | Approval by periodic basis | Review on a staff | Viewed by staff | Acknowledged the owner |
Lets take a quick walk through the lifetime of a policy.
Firstly, a policy is created and assigned an owner. There may be a certain amount of work to get the initial policy document to a point where it is ready to be shared with a third party. At this point, you will define an approver (or group of approvers), who will approve the policy prior to publication.
Staff who are nominated as 'approvers' will receive an email notification and be able to approve the policy ready for publication.
Next, the policy will be reviewed on a periodic basis. This could be annually, every three years or a time period of your choosing, depending on your requirements. Again, an email reminder is sent to notify staff who are required to review a policy.
Finally, the system will audit which staff have both viewed and/or acknowledged a policy, ensuring that all staff see and proactively report sight of a policy.
Lets take a look at how each of these steps are configured when first creating a policy.
Creating a Policy
It's simple to get started and create a policy. Select the Policies option from the tree on the left and a view of all policies will be displayed.
To add a new policy simply click the button labelled 'Add Policy'.
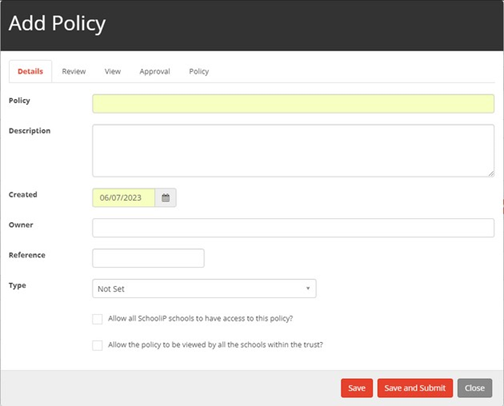
In the resulting dialog, you will have the option to enter the name of the policy, a brief description, a reference and then the ability to define who the owners of the policy will be.
You may select the type of policy from the dropdown list.
There are two tick boxes which allow the sharing of this policy with all schools/colleges and the ability for the policy to be viewed by all schools/colleges within the group.
There is also the ability to define the policy itself. Click the policy tab to see the three options for writing and recording the policy document.
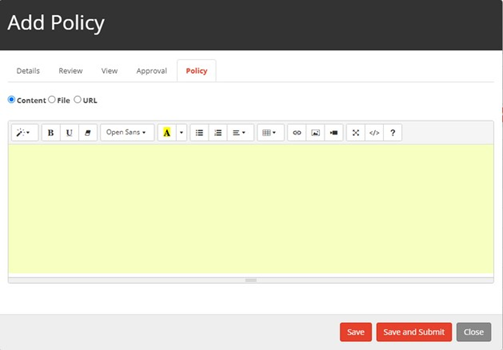
You may either:
specify the content directly in the rich-text editor within the Policy management tool, using all the normal features available including test formatting, adding hyperlinks, images and videos too
Upload a file
Provide a link to an external file e.g. Google Docs or Office 365
Policy Approval
When creating or editing a policy you may set the approval process by selecting the approval tab.
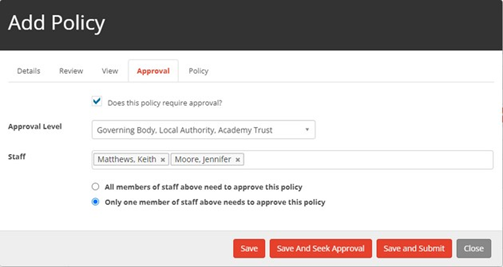
If you select the tickbox to indicate that the policy requires approval, you may then select from the following options.
Approval Level - at what level is approval required e.g. Governing Body, Local Authority or Academy Trust?
You may then select the appropriate staff that you feel will be ale to approve and operate at the prescribed levels.
Finally, there is a radio button which toggles between whether;
all members of staff identified need to approve the policy or only one member identified needs to approve the policy
Reviewing a Policy
When creating or editing a policy you may set the approval process by selecting the Review tab.
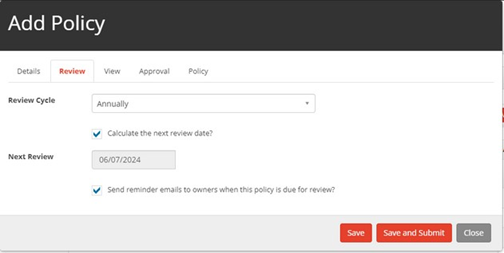
Review Cycle - a dropdown list indicating how often the policy is to be reviewed.
You may then select the 'Calculate the next review date' tickbox which will automatically calculate the next date for you. Alternatively, if you do not wish for this to be the case you may untick the tickbox and set the date manually.
Finally, there is a tickbox indicating whether reminder notification emails will be sent to the owners of the policy.
Viewing/Acknowledging a Policy
When creating or editing a policy you may view who has viewed and/or acknowledged a policy, by clicking on the View tab.
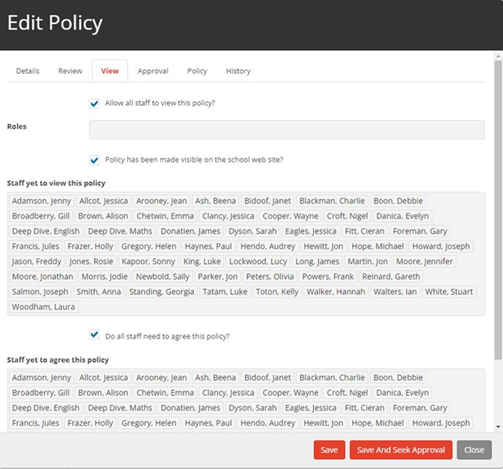
There is a tickbox to indicate whether all staff may view this policy. If this is deselected, you may choose individual staff whom you wish to view this policy.
There is also an indicator of whether this policy has been published on the school/college website.
NOTE: the publication of policies is a manual process and outside the scope of this tool.
There are then two lists of staff indicating whether staff have viewed and/or agreed or acknowledged this policy.
Reviewing your Policies
You can quickly and easily review your policies from the main view by selecting Policies from the contents tree on the left.
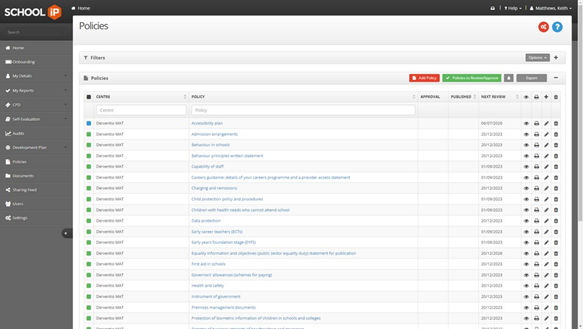
A status icon will appear to the left of each policy indicating the current status of the policy e.g. updated, submitted, etc.
The next approval, next review and published date is clearly displayed on the view too.
You may filter the policies to show those that need to be reviewed or approved. You may also filter to those policies where you are identified as the owner.
There is also a list of filters available at the top of the view with the following options and more:
Approval
Policies overdue
Policies that require staff to agree to them?
Policies that require staff to view them?
Policy has been made available on the school/college web site
Policy Approval Levels
To add/edit Policy Approval Levels, you will require access to the Policy Settings page. To navigate to this page do the following:
- Go to the Settings page on the left sidebar
- Click Go on the Policies tab

Once you are on the Policy Settings page you should navigate to the Approval Levels tab on the left side. Your screen should now look something like this:

To add a new Approval Level you should click the Add Approval Level button in the top right of the tab. This will open the following tab:

The Title field is mandatory, this is what your Approval Level will be visible as throughout your system.
You can assign Staff to this Approval Level using the field in the popup.
To save the policy click Add at the bottom of the popup.
Once you have filled out the fields for the new Approval Level, the page should look more like the image below:

You will see that there are stars in each of the rows. By clicking to turn the star golden (as shown in the image above) this will make the Approval Level the default for policies.
Note: You can only have one default Approval Level at a time


